Descrizione
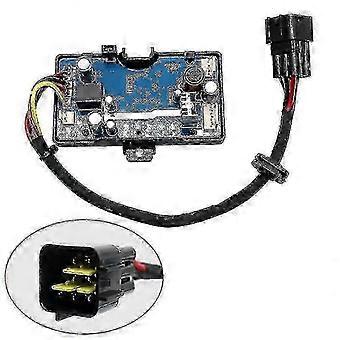
Diesel Air Parking Heater Control Board with LCD Monitor and Remote Switch for Vehicles, Boats, Trucks, and Vans
Note:
Due to shipping restrictions, batteries cannot be included with this item. The remote control is shipped without a battery. Please purchase a CR2032 or A27 3V button cell battery separately upon receipt.
Package Includes:
- 1x LCD Switch & Remote
- 1x Motherboard
- 1x Wiring Harness
- 1x Remote Control
- 3PCS SET: 1x LCD Switch & Remote + 1x Motherboard
- 5PCS SET: 1x LCD Switch & Remote + 1x Motherboard + 1x Wiring Harness + 1x Temperature Sensor
Specifications:
- Color: As shown in image
- Remote Operating Distance: Up to 10 meters
- Input Voltage: 12V / 24V
- LCD Connector: 3-pin triangular plug
- Remote Control: 4-button design
- Battery: Not included (CR2032 or A27 3V button cell required)
Compatibility:
Fits 3KW, 5KW, and 8KW air diesel parking heaters.
Important Notes:
1. A transparent protective film covers the LCD screen. Remove it before use.
2. If your original motherboard and controller have all-black connectors matching ours, you may replace either component individually. If they differ in appearance or connector type, both motherboard and controller must be purchased together for compatibility.
3. The remote control is designed exclusively for use with our matching controller and motherboard.
4. To purchase a complete set (LCD switch, remote, and motherboard), select the 3PCS SET option. Selecting only “LCD Switch & Remote” does not include the motherboard. Selecting only “Motherboard” does not include the controller or remote. Please verify your selection before ordering.
Remote Control Pairing Instructions:
1. Press and hold the UP button for more than 3 seconds while the heater is powered off.
2. The display will show “HFR-”, indicating entry into pairing mode.
3. Press the UP button again to transmit the pairing code.
4. The heater will power on once the code is successfully accepted. If the code fails, the heater will not start.
5. Pairing mode exits automatically after timeout.
Parameter Setup Instructions (press SET button to enter setup mode):
1. Time Setting: Use UP/DOWN buttons to adjust hour (24-hour format), minute, and other parameters. Press ENTER to confirm and proceed.
2. Timer Power-On: Default = OFF (display shows “1oF”). Press UP to enable (“1oN”), then press ENTER to set hour and minute. Countdown timer supports up to 99 hours and 59 minutes.
3. Timer Power-Off: Default = OFF (display shows “2oF”). Press UP to enable (“2oN”), then press ENTER to set hour and minute. Countdown timer supports up to 99 hours and 59 minutes.
4. Administrator Password Entry: Use UP/DOWN buttons to select digits. Press ENTER after each digit. After entering the correct 4-digit password, press ENTER to proceed. Incorrect input returns to first digit. To exit without changes, press SET repeatedly or wait 10 seconds for auto-exit.
5. Fuel Pump Oil Volume Setting: Use UP/DOWN buttons to set minimum oil volume. Press ENTER to confirm, then adjust maximum oil volume similarly. Press ENTER to proceed.
6. Fan Speed Setting: Use UP/DOWN buttons to set minimum fan speed. Press ENTER to confirm, then adjust maximum fan speed. Press ENTER to proceed.
7. Operating Voltage Setting: Must be configured only when heater is powered off. Use UP/DOWN buttons to select voltage: “U-12” for 12V systems, “U-24” for 24V systems. Verify compatibility of fuel pump, motor, and glow plug before startup.
8. Speed Signal Selection: Display shows “5N-1” by default. Use UP/DOWN buttons to select: “5N-1” for single magnet or opposite-polarity magnets; “5N-2” for same-polarity dual magnets. Incorrect selection may double displayed RPM.
9. Glow Plug Power Setting: Display shows “PF-5” by default. Use UP/DOWN buttons to select power level: 1=35W, 2=40W, 3=45W, 4=80W, 5=85W, 6=90W. Default (5) is recommended unless verified otherwise.
10. Administrator Password Change: Initial display shows “oF”. Press ENTER to skip or proceed with change.
-
ID Fruugo:
461704496-971964714
-
EAN:
9067048143626
Informazioni sulla sicurezza del prodotto
Si prega di consultare le informazioni sulla sicurezza del prodotto specifiche per questo prodotto descritte di seguito
Le seguenti informazioni sono fornite dal rivenditore terzo indipendente che vende questo prodotto.
Avvertenze di sicurezza:
Please use the product correctly according to the product manual